Sunday, September 23, 2012

Playing with Monotypes


.
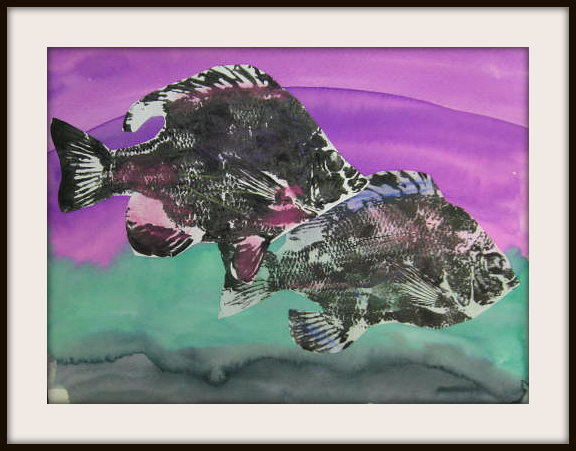
 Monotype using stamps and bleeding tissue with drawing in chalk pastels
Alexis - 9

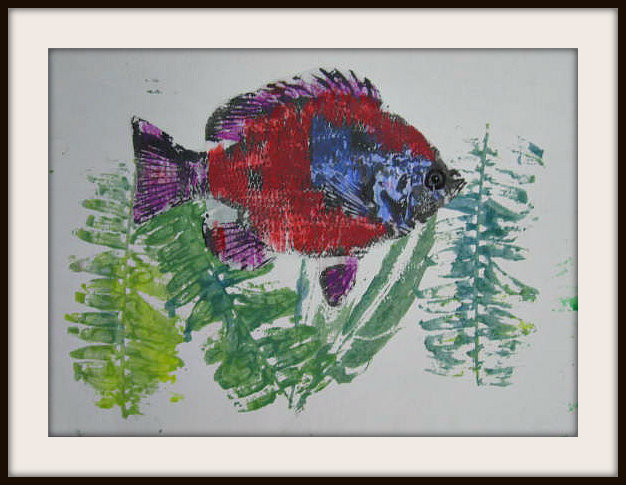
Monotype, bleeding tissue and acrylic with drawing in colored pencils
Savannah - 10


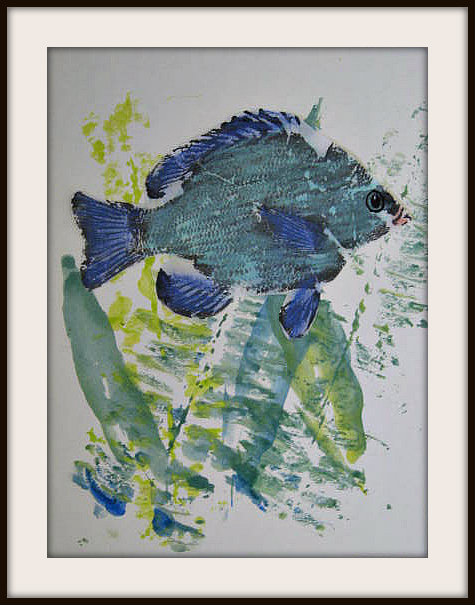
I stumbled across the work of artist Rachel Pank and fell in love with her series of monotypes with birds. I set out to do some experimenting using acrylic paints on the back of a baking sheet. I painted a thin layer of acrylic paint in several colors and removed some of the paint using stamps and sponges to create texture. This was printed onto a piece of poster board. I also added some pieces of bleeding tissue on some parts for more layer of color. I played around with a variety of media to see what I liked best. My daughter and her friend even joined in on the fun with me. My mixed media art class this week will be creating monotypes with reduction prints inspired by Panks' work. I will be posting those as they finish them.


Monotype with Sharpie and pastel


Sharpie and black acrylic


Monoprint and bleeding tissue with a reduction printed bird,
pastel and thin marker


with a reduction printed bird and stamps, thin marker drawing


This was cut in half to create the above two pieces


Wednesday, September 19, 2012

Blog on Pause

This may just be the longest gap between posts I've had since I started Marymaking. I had my Mother urge me to hurry up and post something new and even a fellow blogger check in to see if I was ok. Thanks Pat! ;) Here's just a bit of what's been going on in my neck of the woods.

ART


My after school classes have been a little lean this fall.
(This tends to be a very busy sports season for families around here)
I have been doing some of my summer favorites with my new crew.


LIFE


Our lives begin and end with water these days.
Getting my son to sunrise surf sessions each morning with his high school surf team.


Sunset lap swims for my daughter at the local pool.


MILESTONE

Tomorrow my husband Tyree and I will celebrate our 20th anniversary.

We have had many unique experiences and adventures together.
We have weathered Hurricane Hugo, rocked and swayed to more than a few earthquakes, taken a cross country road trip in a Dodge Daytona...with a dog, experienced the horrible L.A. Riots, helped one another recover from surgery following shattered limbs - an ankle for him, an elbow for me, catered weddings and events together, and of course welcomed our two children into the world. And this is just the abbreviated list!

I hope to be cranking out blog posts in a more timely manner in the near future.
Thanks for your patience!

Monday, August 20, 2012

Chinese Lion Dancers


I can't take credit for any part of this wonderful Chinese Lion Dance lesson other than the fact that I had the good sense to "borrow" it from smART Class. Thank you Natalie! This was the perfect finale to my Art Across the Globe classes this summer.
After the children watched some wonderful lion dancers in action, they followed Natalie's fantastic draw along lesson. Background fireworks were created with oil pastels and line work traced over with black oil pastel before painting their lions with watercolor.

I had a wonderful time this summer with my 6 art class groups. Thanks to all the children who joined me for some creative time!

Thursday, August 16, 2012

Egyptian Tint and Shade Landscapes


It's always interesting to me to learn which projects end up as favorites with my students. Sometimes I just know, other times, I'm surprised. Such was the case with these tint and shade landscapes with Egyptian pyramids - a real crowd pleaser.

After using acrylics to paint our subjects, the children created three different patterns on colored construction paper using Sharpie and oil pastels. We looked at some of the colorful blankets that often adorn camels in the Middle East as inspiration. These were cut up into squares to create a border for their paintings. Work created by 5-10 year olds.

Thursday, August 9, 2012

Bronwyn Bancroft Inspired Animals


About a year ago I was thumbing through picture books next to the 3 and 4 year olds at my local library. (Yeah, I'm cool like that....and yes, I do read grown-up books with words as well ;)
I came across the lovely "Possom and Wattle" by Bronwyn Bancroft, and I've been a fan ever since. Beyond these colorful, graphic illustrations with roots in Aboriginal dot art, Bancroft creates gorgeously intricate paintings rooted in her Australian Indigenous ancestry. ( She is committed to the protection of these artists' rights as well.)

My students first chose their background colors, and were encouraged to chose 3 or 4 on the same side of the color wheel to create an atmosphere for their animal. We looked and at some of Bancroft's animals for inspiration and the children chose between wombats, dingos, koalas and kangaroos or they could choose their own. They created graphic animals using Sharpie and oil pastels on marbled construction paper. Last, they created painted dot designs on their painted backgrounds using the ends of their paint brushes. Their animals were then cut out and glued to these painted backgrounds. (Works created by 1st thru 5th graders)

Saturday, August 4, 2012

Gyotaku Explorations


I have been mildly obsessed with the Japanese art of Gyotaku lately. I have scoured the internet for different interpretations of this elegant art form. Some of my favorites came from this collection of 3rd graders on Artsonia.

I wanted my two groups of K thru 5th graders to try a couple different methods for their Gyotaku. We worked with wet on wet watercolor backgrounds as well as creating prints using ferns, plants and feathers to mimic the look of seaweed. As much as I wanted to use a real fish, I opted for a lovely rubber blue gill. I thought the smell and the "gross out factor" for some, might be an issue that would distract from the overall lesson. (Though I am bound and determined to try this with the real thing eventually.) I allowed each student to make 3 prints with rice paper as well as regular printer paper. These dried quickly enough for the children to use chalk pastel to add color and definition to their fish. Some opted for realistic hues, while others let their imaginations run wild. Some children have more tweaking to do with their pieces on day two. This lesson was all about the exploration of media, but moreover, an introduction to this mid 19th century art form of "fish rubbings" by Japanese fisherman.

Supply List

Rice Paper or Printer Paper (81/2 X 11)
Watercolor Paper (9 X 12)
Watercolor Paints and Large Brushes
Black Ink or Watered Down Craft Acrylic Paint
Brayer or Sponge Brush
Chalk Pastels
Sharpie Marker
Scissors and Glue Sticks
Rubber "Gyotaku" Fish Found at Dick Blick or Amazon


Children take turns making prints of the fish by using a brayer or sponge brush to apply a think layer of ink or watered down craft acrylic. They will lay a piece of rice paper or regular printer paper on top and gently rub to get all the details transferred to the paper. Put these up to dry. For the backgrounds, children can use a wet on wet watercolor technique by painting their piece of watercolor paper with water only and then adding watercolor on top. Colors will "bleed" together. These are put up to dry. Once their Gyotaku fish prints are dry, children can add color by gently using the sides of chalk pastels and blending colors with their pointer fingers. Definition to the fish's eye can be added using Sharpie markers. Fish are then cut out and glued to their dry watercolor backgrounds.

Tuesday, July 24, 2012

Luna Moths by Moonlight


These multi-media pieces were created first with a dry brushed acrylic background on black paper - no water allowed. We put these up to dry and created our symmetrical Luna Moths by drawing on one side of a folded paper with pencil, closing it up, and rubbing the back with the end of marker to create a mirror image. We learned that moths are active at night(hence the name Luna for moon) unlike butterflies who are active in the daytime. And unlike butterflies, Luna Moths have no mouths, so cannot eat. For this reason, they only live about 1 week. We looked at pictures of them and noticed their beautiful shade of light green and how they have spots on them that look like eyes. With their observations, the children added more details to their drawings. Lines were gone over in Sharpie and color was then added using chalk pastels. Before cut moths could be glued to their moonlit landscape, trees were added with oil pastel and moon and stars using acrylics. I was very pleased to see my group of K thru 4th putting their own unique spin on this project. Well done guys! I've had a fun few weeks exploring a variety of media and techniques with you!

(Since these nocturnal beauties are more prevalent on the east coast and Canada, I have never had the opportunity to see one, but they are truly stunning in photos. Their distinct and unique beauty is what inspired this project - as well as last years' moonlit fireflies.)